Scion xB 2005 - Fuel Filter replacement DIY
Warning: this is for educational purposes only. Neither I nor anyone else on the planet is responsible for your stupid decisions and lack of thinking. The information provided here is the best of my documenting ability and nothing more. Like ANYTHING on the internet, it should not be considered as the full truth with no missing pieces. If I leave anything out, it's your responsibility to find the rest of the puzzle. ie, if you blow your car or yourself into a million pieces, it's YOUR fault.
Note: This took a lot more effort than I had anticipated even with the other DIY articles I found on this subject. I personally will be paying someone to do it for me next time. If you decide to take this on, I suggest you go ahead an replace the fuel pump while you are at it, as long as you have at least 60,000 miles on the toaster. My pump died at 94k miles.
Before you begin, make sure you have access to tools as you will need a wide range of them. You will find out what size as you go. I am not going to list those details.
Other DIY articles have stated you need to remove the back seat. This is not entirely correct. You CAN remove the back seat, but it is not necessary. Removing it will just make things less crowded. You can just use some bunjee cords and connect the two hinges of the back seat to the back door hinge and that will keep the seat up and out of your way. If you decide not to remove the back seat, skip ahead to the next step.
Removing the back seat (optional)
First remove all the "trunk" gear, like the spare tire and emergency gear, until you see the floor/frame. You will see 3 bolts connecting the seat to the frame. You will need to unscrew these.

You will find one more in the front of the seat (circled). Lift up the seat and it will pop off the hinge easily. Pull the seat belts through the cushion holes to allow the seat to go higher, making it easier to remove the bolt. Dont bother removing the bolt for the seat belts (squared).

Return to the back and release the vertical locks for the back seat, lowering the seat back. In the far corners you will see the seat back is connected to the frame/ Pull apart the carpet covers to expose the bolt. remove these bolts and the seat can now be removed.


On to the filter:
Now that the seat is removed, or if you just lifted up the seat, you now have the exposed carpet. Lift away the center square of carpet and you will see the image below.

Pull apart the rubber cover that protects the wiring.

use a flat screwdriver to pry open the metal cover. It's only sealed by sticky goop so no bolts need to be removed. pry apart the cover plate carefully and spread it apart evenly. If you focus on one point you will easily bend the cover plate.
As you can see, it's very dirty underneath. so as you go from here, use some wet wipes to clean the area as much as possible. you do not want to get dirt in your fuel system.

Below are the components labeled as best I could provide. You will need to remove all four of these components to remove the filter assembly.
Edit: turns out the intake valve is actually the return valve. the intake is inside the tank filtered by the sock first.

for the sensor, use one hand to squeeze the release and the other hand to pull the harness toward the back of the car.

Now remove the guage. Use some pliers to squeeze the top of the release, then use large pliers to remove THE ENTIRE GRAY harness. It looks like the top part comes off, but all the gray you see will pop off.

With these two removed, the engine will not receive any more gas. Start the car and let it die on its own. this will drain the lines (as much as possible) of gasoline. Once the car dies, disconnect the battery and make sure it will not accidentally reconnect.
optional step: you can disconnect the gas line from the engine. this will simply reduce the pressure in the line and less gas will spill out when you remove the out valve later.


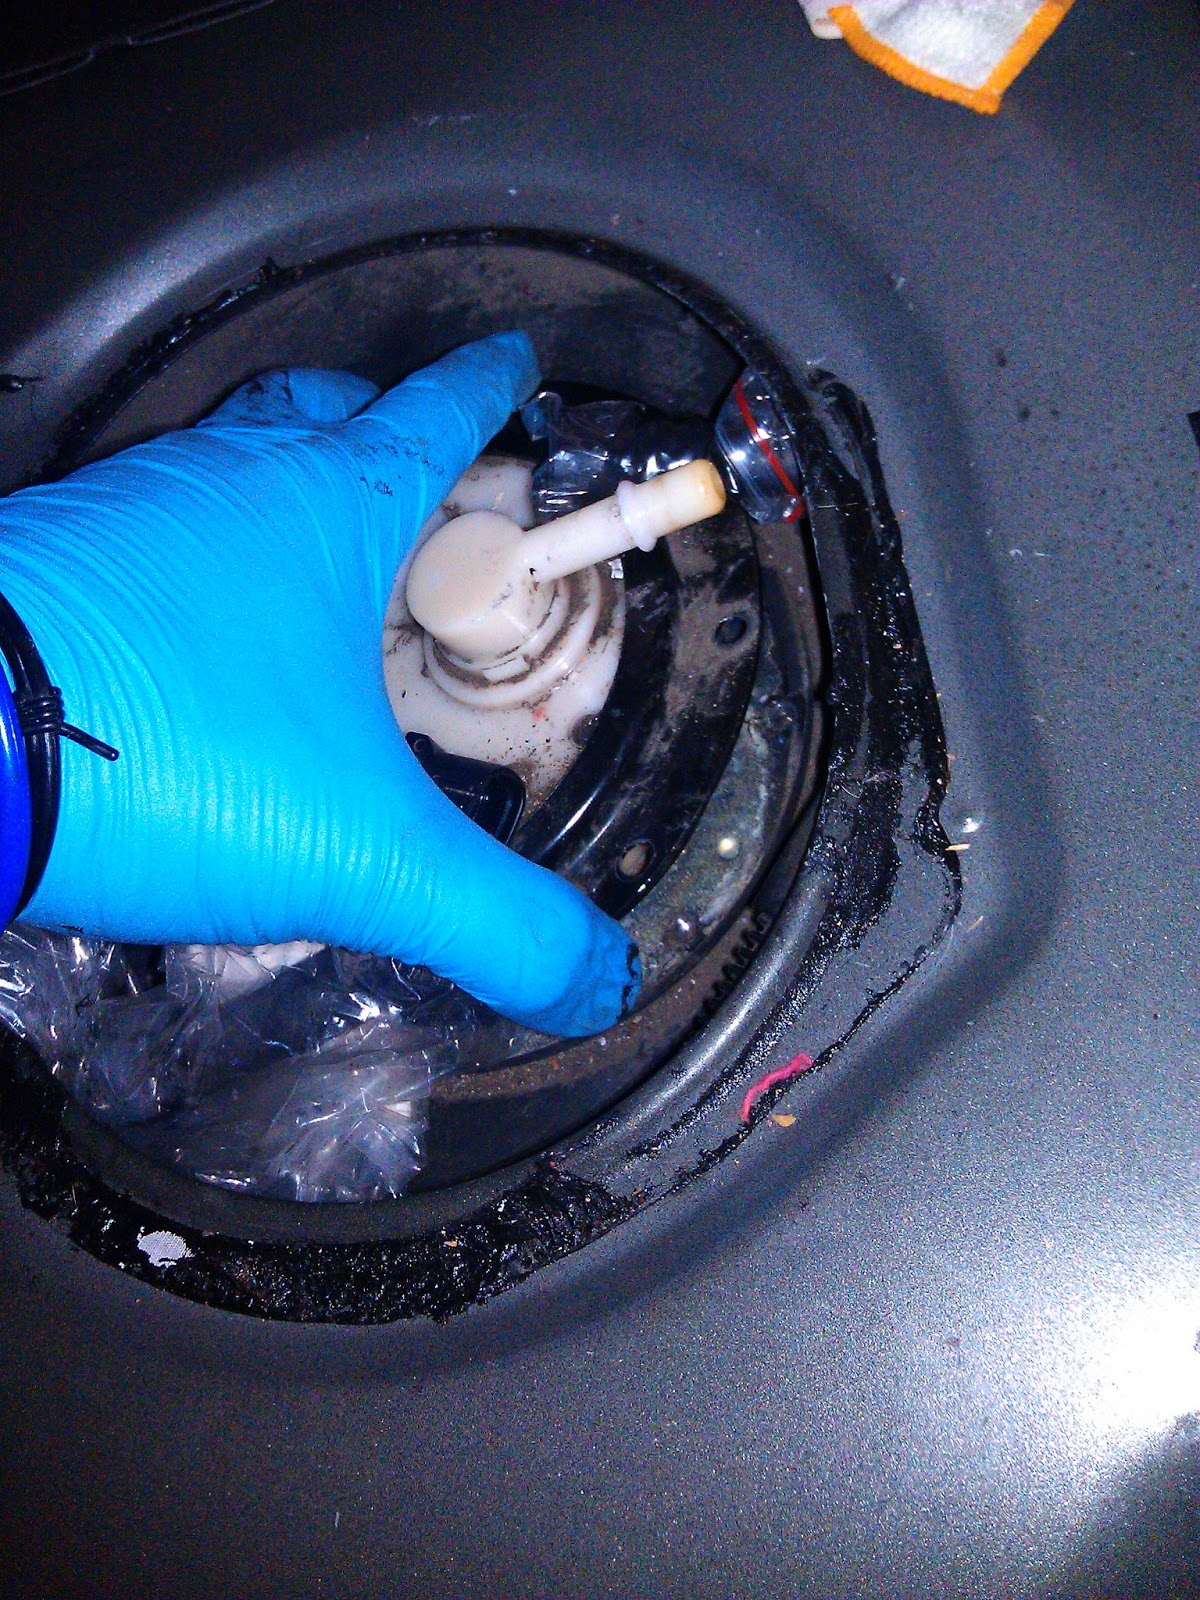
Now let's remove the out valve. You will see a small yellow C-shaped pin that holds down the valve. Slide this pin toward the front of the car and DO NOT LOSE OR BREAK IT. This is a proprietary part that cannot be found in auto part stores (I already tried, the ones in stores are too thick).

Unscrew the bolts (all of them). two of the bolts hold down the intake valve cover piece.

Remove the cover piece and you will see the intake valve clamp (circled). Keep cleaning. Remove the valve from the assembly. This proved to be very difficult for me because the 2 release switches simply would not release the lock. I had to pry apart the pins in the direction the releases were supposed to be moving it just to get the valve removed.
WANING: don't damage the valve too much. if you have to replace it, you cannot just replace the valve head that connects to the assembly. The part you get from toyota is the entire hose piece and running that in and under the car will not be a fun task.

If you can, place both valves in plastic bags to prevent dirt or dust from getting into the valves.

Before you attempt to remove the filter assembly, take note of the positions of the two circled items. You will need to place the pieces back in these positions, or you will have a hell of a time re-seating the bolts or the guage may not work.

Now that all bolts and valves are removed, you can start to remove the filter assembly. BE CAREFUL, go slow and steady. You will need to rotate and tilt the filter to get it out because of the gauge level arm and the filter sock. You can use the return pipe (circled above) to pull up and rotate the filter.


Place the filter in a clean pan.

At the base of the filter, remove the plastic cover. There is a rubber cap underneath the plastic which covers the base of the sock. remove the rubber piece and keep all these items handy and clean.

I dont have a picture, but you need to remove the guage level arm. it's not that hard, just don't force it cuz you can easily break it.
The circled area is the release lever. Press the lever down with a screwdriver and then move the gauge assembly toward the base of the filter (in the direction of the arrow).


now remove the top portion, you will see the 4 latches that can be easily undone using a screwdriver.
Note the circled area. the round plastic piece fell right off for me. So if it falls off for you, this is where it goes and how it should be placed.

The circled area below will contain the small o-ring. remove it from the old unit and place it in the new unit.

Note: This took a lot more effort than I had anticipated even with the other DIY articles I found on this subject. I personally will be paying someone to do it for me next time. If you decide to take this on, I suggest you go ahead an replace the fuel pump while you are at it, as long as you have at least 60,000 miles on the toaster. My pump died at 94k miles.
Before you begin, make sure you have access to tools as you will need a wide range of them. You will find out what size as you go. I am not going to list those details.
Other DIY articles have stated you need to remove the back seat. This is not entirely correct. You CAN remove the back seat, but it is not necessary. Removing it will just make things less crowded. You can just use some bunjee cords and connect the two hinges of the back seat to the back door hinge and that will keep the seat up and out of your way. If you decide not to remove the back seat, skip ahead to the next step.
Removing the back seat (optional)
First remove all the "trunk" gear, like the spare tire and emergency gear, until you see the floor/frame. You will see 3 bolts connecting the seat to the frame. You will need to unscrew these.


On to the filter:
Now that the seat is removed, or if you just lifted up the seat, you now have the exposed carpet. Lift away the center square of carpet and you will see the image below.

Pull apart the rubber cover that protects the wiring.

use a flat screwdriver to pry open the metal cover. It's only sealed by sticky goop so no bolts need to be removed. pry apart the cover plate carefully and spread it apart evenly. If you focus on one point you will easily bend the cover plate.
As you can see, it's very dirty underneath. so as you go from here, use some wet wipes to clean the area as much as possible. you do not want to get dirt in your fuel system.

Below are the components labeled as best I could provide. You will need to remove all four of these components to remove the filter assembly.
Edit: turns out the intake valve is actually the return valve. the intake is inside the tank filtered by the sock first.

for the sensor, use one hand to squeeze the release and the other hand to pull the harness toward the back of the car.

Now remove the guage. Use some pliers to squeeze the top of the release, then use large pliers to remove THE ENTIRE GRAY harness. It looks like the top part comes off, but all the gray you see will pop off.

With these two removed, the engine will not receive any more gas. Start the car and let it die on its own. this will drain the lines (as much as possible) of gasoline. Once the car dies, disconnect the battery and make sure it will not accidentally reconnect.
optional step: you can disconnect the gas line from the engine. this will simply reduce the pressure in the line and less gas will spill out when you remove the out valve later.


Now let's remove the out valve. You will see a small yellow C-shaped pin that holds down the valve. Slide this pin toward the front of the car and DO NOT LOSE OR BREAK IT. This is a proprietary part that cannot be found in auto part stores (I already tried, the ones in stores are too thick).


WANING: don't damage the valve too much. if you have to replace it, you cannot just replace the valve head that connects to the assembly. The part you get from toyota is the entire hose piece and running that in and under the car will not be a fun task.

If you can, place both valves in plastic bags to prevent dirt or dust from getting into the valves.

Before you attempt to remove the filter assembly, take note of the positions of the two circled items. You will need to place the pieces back in these positions, or you will have a hell of a time re-seating the bolts or the guage may not work.

Now that all bolts and valves are removed, you can start to remove the filter assembly. BE CAREFUL, go slow and steady. You will need to rotate and tilt the filter to get it out because of the gauge level arm and the filter sock. You can use the return pipe (circled above) to pull up and rotate the filter.

Place the filter in a clean pan.

At the base of the filter, remove the plastic cover. There is a rubber cap underneath the plastic which covers the base of the sock. remove the rubber piece and keep all these items handy and clean.

I dont have a picture, but you need to remove the guage level arm. it's not that hard, just don't force it cuz you can easily break it.
The circled area is the release lever. Press the lever down with a screwdriver and then move the gauge assembly toward the base of the filter (in the direction of the arrow).


Note the circled area. the round plastic piece fell right off for me. So if it falls off for you, this is where it goes and how it should be placed.

The circled area below will contain the small o-ring. remove it from the old unit and place it in the new unit.

I dont have any pictures from here. but remove the rest of the items from the filter assembly and reassemble using the new filter. disconnect the wire harnesses and then push out the center piece (that's the fuel pump) that connects to the sock by pushing to toward the base. remove the regulator that is next to the sock and place everything in the same position on the new unit. restore everything back the way you found it by reversing the above steps.
Once you get everything connected, don't patch up the cover yet until you've tested it. reconnect the battery and disable any alarms you may have. some people will say you can turn the key to ON and it will begin pressurizing the fuel system. this is not true for xB 2005 (likely for 2006 or older as well). I tested this and confirmed the fuel pump only works while the starter is cranking. So when you are ready, you will just have to keep the starter going for an extra 5-15 seconds to get enough fuel into the system to start. If it doesnt start by then, you may have forgotten something, a bad connection, or a bad fuel pump.
Start the car and make sure it runs for a good 30 seconds. Turn off the engine and wait 30 minutes. start the car again. If all is well, you can patch up the cover and replace the seat. If you have problems you are going to have to double check your steps.


Great presentation .
ReplyDeleteThank you
Walter
Thanks for taking the time to provide this detailed and enlightening procedure.
ReplyDeleteYou replaced the Fuel PUMP, NOT the fuel FILTER.
ReplyDeleteGood tip on the oring and plastic nipple that falls out . Parked my car on a hill today, after changing the fuel filter... no start situation. Very hard to start and extremely hard to get out of the spot . It fell out on me and I put it in backwards.
ReplyDelete