The cat sanctuary
I started out with my cat (Sake) in a room i was renting in San Diego. I had to keep the litter box in the same room as the cat wasn't allowed outside the room. Needless to say the smell got annoying regardless of often I would change out the litter. The real problem was that Sake, on occasion, would fail or forget to bury his litter like most cats do. It wasn't an everyday thing, but it's still annoying. So when I moved to my apartment in Phoenix, I still had the same problem.
So I decided the best place to put the litter box would be outside on the balcony.
In this case it actually was a good idea because I was on the third floor so the balcony was too high to tempt the cats to jump off and there was nothing else nearby to which they could jump. So I got one of those sliding glass pet door inserts and taught the cats how to use it.

In this case it actually was a good idea because I was on the third floor so the balcony was too high to tempt the cats to jump off and there was nothing else nearby to which they could jump. So I got one of those sliding glass pet door inserts and taught the cats how to use it.
Not only did the cats use it for litter box needs, they loved having the option to go outside whenever they felt like it and getting some fresh air and sun....or stare at birds on the closest tree.


This got me thinking of my future home since I was looking around for a house to buy. So for the next 12 months, I thought about creating an outdoor area for my cats similar to my balcony at my apartment. It surprised me how complicated it turned out to be, but I was glad I took the time to think of it beforehand.
So as I've visited friends at their homes, I've seen some folks have used the pet doors that go through the walls. They have 2 doors and a wall kit that connects the doors. Because of the double door, it provides decent insulation. I also heard from friends that the sliding glass pet door insert I had been using is not a good idea on a house. Apparently they are easy to get around without major modifications which would make it very difficult to remove later on. So I decided the wall kit pet door would be the way to go.


Picking a location helped determine this project. I thought about the garage at first as many have done in the past, plus the garage entry door already had a pet door. But I realized the litter stink would not be any better inside the garage. It would simply remove it from the house and confine it to the garage. Not the greatest idea for me since I planned on keeping my car in the garage and often forget to roll up my windows. In order for the smell to remain at its least annoying level, the air around it needs to circulate as much as possible. This brought me back to the balcony experiment. I knew the boxes needed to be outside, so I knew it was going to be some kind of cage.
Now I needed to pick a wall to place the pet door. But that really depended on where the cage could possibly go. The west side of the house was blocked by the pool equipment, the south side was mostly the pool and backyard but had one small area I could use. The north side is the front and not very neighbor friendly, and the east side had been floored with bricks and mortar, so I knew I couldn't dig (easily) there. The backyard dirt area that bordered my master bedroom appeared to be the best candidate.
The drywall was the easy part. With the right precision tools, its a snap.


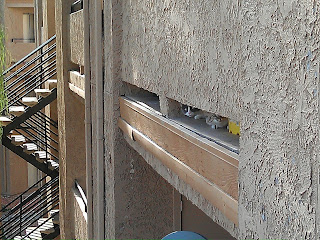
So here is where the fun began. Being my first home, I pretty much have nothing in terms of tools. That stuff takes time to build up a collection. So fortunately my friend Scott was able to help me with his tools to bust the hole through the wall. And that was the "fun" part. Sadly, in Phoenix, brick homes are rather popular. I hadn't even seen one in San Diego. And there was no information about putting a pet door in a brick home. So we learned the hard way how to poke a hole through brick without explosives.
The first problem was the actual width of the brick. You would think (by looking at them) it's just standard bricks. But it turns out they are hallow cinder blocks. So drill bit length became an issue. Word of advice, dont go to Harbor Freight tools for drill bits on a project like this. They wouldn't drill through cardboard. Home Depot had the bit that worked. But it wasn't enough to be time efficient. So Scott broke out the air compressor and his chisel hammer. Incredibly loud and throwing concrete dust in the air, it actually worked.


Once we had the correct shape cut out, we attempted to throw in the wall kit per the instructions. Unfortunately, the manufacturer of the wall kit did not include any way to adapt for extra wide walls, such as brick homes. So the long screws that were included would not reach to the other side of the wall. So we basically had to run over to Ace Hardware and create a coupling system to extend the screws as far as they needed to go. Major pain, but it worked. But if had known this, I would have insisted on a wood frame house. Once we got both sides connected, there was a 2 inch gap in the wall because the wall kit provided was not as wide as needed for brick houses. So to improvise, we used the foamy insulation goop used for gaps and cracks. we filled up all the extra brick space and a little extra for the gap. Once it dried, I used a drywall blade as well as a utility knife to cut the gap to match the wall kit. So basically there is a 2" foam bridge that connects the wall kit to the outer door. It's not pretty but it works. Plus the use of the foam insulation is, of corse, insulation. So 2 birds one stone.
So, annoying story short, the pet door was done.


I kept the cover on the inside so the cats couldn't go out just yet. Now it's time to get the cage built.


I kept the cover on the inside so the cats couldn't go out just yet. Now it's time to get the cage built.
First I had to look at where the water would run whenever it rained. I noticed the slope was going towards the house, so I first had to add soil to correct the slope to go away from the house and cage. In thinking about the dimensions, i knew it would be a lot easier to get a roll of 50' fencing at home depot, and just roll it around the perimeter. If i kept the width the same as the height, then i could roll on a top layer as well for the roof. So my plan was a rectangular design. I mapped out a 3' x 6' design and marked where it needs to be. From there, I had to do a blue stake request because I knew I would be digging some stakes into the ground and I really don't need to bust a water main or get electrocuted. Although if I happened to cut a line owned by Cox, I would have made a separate blog about that since I hate them.
Rain was a big issue. I needed to protect from rain above and below. Starting from the ground up, I knew the cage ground level needed to be higher than the actual ground level. Instead of making a giant hill of dirt or using cement to stabilize it (which is not fun), I decided to just use square brick tiles as the ground surface. The brick tiles would raise the surface level by 1.5". Plus, I needed a way to prevent the water from pooling on top of the tiles. So I separated the tiles and did NOT add the grout one would normally use to join them together. The gaps between tiles provide drainage and channel the rain water out of the cage which is exactly what I needed.


After the blue stake completed their markings, my spot was free and clear to dig. unfortunately, I didnt have any good digging tools and the shovel I had was awful. I got most of the stakes planted deep enough. but one stake hit a patch of very hard clay that I couldn't pound through. I tried everything but I ended up just using cement to reinforce the stake in it's hole.
With the floor tiles in and the stakes creating the perimeter frame, it's time to add the fence. At first I got a roll of chicken fence. I learned quickly that my cats can easily bend chicken wire. On top of that, it's not coated, which means it could eventually rust or I'd have to paint it which could prove difficult. So I got the next fence available at home depot. It was stronger and coated in green vinyl to prevent rust. I rolled it around the perimeter to create my fence walls, leaving the last section to later become the door.


I got some 1" wood posts from Home Depot and cut them to the required length to match the dimensions of the cage. I placed them at the top edges of the cage to provide stability for the roof.


To bind everything together, I used twist-off zip ties. I learned this was key since it helped prevent sharp edges that normal zip ties will cause when you cut off the slack. However, I discovered that I needed a good 200+ zip ties to adequately build this cage. I could have reduced this if I had a better method of temporary joining. So I ended up using ties twice in the same areas, but I spaced them out in different intervals to make the best use of the extra ties.


Once the roof edges were complete, I added the roof fencing.


From there, I needed a door so I could change out the litter boxes. This required some additional wood posts including one that went diagonal across the door for additional support. Home Depot did have a stronger metal door/gate I could have bought, but I didnt think it was the right fit. After cutting the fence to create the door, it left some additional bits that would normally poke anyone nearby. I used these bits as an anchor to the cage, basically making hinges for the door.


Once the door was reinforced, I moved onto the cover. I bought a 9' x 9' tarp at Home Depot for $10. I measured the lengths needed to cover half of the cage, then i added about 6 inches to the width to let the tarp hang over the door as extra rain protection. Once that piece was on, I added another piece to cover the door to protect against windy rain.


From there I needed a way to lock the door so that cats couldn't get out and something to keep the tarp from blowing away during the next monsoon. I used some bungee cords which ended up solving both problems. I used a knife and poked holes in the tarp for additional air circulation.
One of the last pieces was preventing escape. First, I needed to cut a hole in the fence to open the path to the outer pet door. Once the hole was cut, the right side of the hole was weaker and provided possible escape. Even if it wasn't possible, the cats could try and thus endanger themselves. So I planted another stake on the right side of the hole to reinforce the fence.


The only other escape was the outer wall lower edge. There were no wooden posts like on the roof, so i needed something to prevent the cats from attempting to dig under the fence. Even though the tiles were 1.5" high and made digging very difficult, cats are quite resourceful. So I ended up finding some other gray bricks at Home Depot that served a good purpose. As seen in the images below, the bricks are slotted because they are meant to be broken into pieces. But the slots served a nice purpose because instead of blocking the water, it allows water to flow from the floor tile irrigation channels. Plus, it has little half circle indentations which ended up being perfect to place some cheapy wal-mart solar LED lights.


I thought the solar lights weren't very necessary, but then I remembered both my cats have their issues with missing the box completely. So providing a little light in the after hours couldn't hurt. From there all that was needed was a step for the outer door since ground level outside was about 12 inches lower than the ground level inside. So i placed a cinder block in front of the door and that was plenty.


Beyond that, I added a few shoelaces and other teasers to the cage as it is now complete. The only thing I need to fix is the the door swings the wrong way, thus the bungee lock is difficult to use. I will fix it eventually, but for now it works fine.
I hope this helps anyone that wants to do the same for their cats. There is a lot to think about and had I not prepared as much as I did I would have wasted a lot of time and money buying and doing the wrong things. I do recommend something like this. So far it's working GREAT. the smell is never noticeable when going outside and obviously it's not an issue when inside. It's rained a few times and no issues so far. I can fit two cat boxes in the covered side of the cage and there is still 10 inches of covered space before reaching the boxes (thus it has to be very windy for the rain to get to the boxes).


But most of all, my cats LOVE going out there. They chill outside all the time while getting some sun and fresh air. They can't escape and they are safe from most threats out there. The only bad thing in this area is scorpions and occasional snakes. So I am thinking of placing some plastic 6 inch plates at the base of the cage so little critters have a hard time getting in the cage. But that is on my to-do list for now. Should a large dog, coyote, or stupid human try to get at them, the cage is strong enough to give the cats enough time to get back in the house.
Thanks again to Scott for his help and use of his tools.


Comments
Post a Comment